
There is nothing more satisfying than building something from scratch. It’s fun, it’s creative, and it gives you a sense of accomplishment. But sometimes you just want to craft something without having to build it yourself. In this article, I share 5 DIY projects that will make you feel like a kid again.
Sometimes we just want to tinker with our hands without having to build anything. These projects are perfect for that. We have included projects ranging from making a hand heart card, to making flower hands.
Hand heart cards
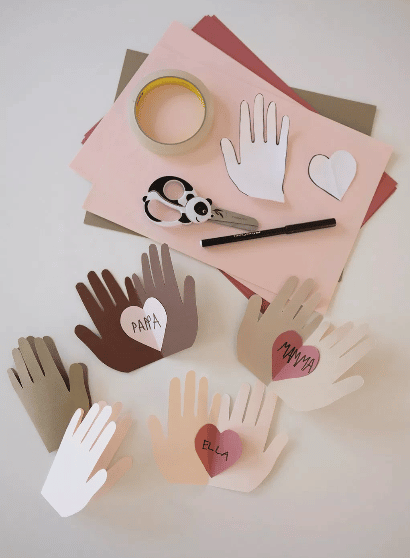
We love the idea of spreading some love without buying anything, so we’ve made some Hand Heart cards to give to our parents and loved ones. These cards are great fun to make with your host children. They are super fun to make and very easy! Any age is suitable for this craft activity, but the little ones will need a little more help.
What do you need for making Hand Heart cards
- Colored A4 paper
- White A4 paper
- markers
- Paint
- Brushes
- Water (for the brushes)
- Old tea towel or kitchen roll (to dry the brushes)
- Decorations such as stamps, nice stickers, beads, etc.
- Scissors
- Glue or tape
- Your own hands!
What do you have to do to make Hand-Heart cards?
- First choose your favorite color of paper, which you will later trace your hand on.
- Start by tracing your hands. Children can do this very well themselves on a piece of colored paper.
- When you have wrapped your hand, cut it out
- To make the heart template symmetrical, fold a piece of paper and draw half a heart and cut it out. (You can use plain white paper for the templates)
- Fold a colored paper to make the hand card (it should be large enough to fit in the hand).
- Place the hand template with the little finger against the edge of the fold and draw the hand on the card. With young children, it is best to help them, because this is a difficult job.
- Trace the heart on a different color paper and cut it out. Write a name or a sweet message on the heart you made and stick it on the hand card. So it’s that simple!
You can make as many Hand-Heart cards as you want. Make one for grandpa and grandma, mom and dad, brother or sister, or your best friend! Have fun
Source: https://makencreate.com/?p=2170
Chicken hands

Rain… You and your host children really can’t wait for that today. But don’t worry, we have come up with a very nice indoor activity for you! Because how cute are these chickens?! And not difficult at all. As an au pair, you can do this very well with your host child. All children can participate in this craft activity. Again, the little ones may need a little more help. But that’s just fun, that creates a nice bond with the baby
What do you need to make a chicken hand?
- Your own hands
- Orange, red, yellow, white, or brown A4 paper
- Colored A4 paper (for the background)
- Orange or red leaflet
- Pencil
- Markers or paint
- Scissors
- Glue or tape
What do you have to do to make chicken hands?
- Trace your hand with a pencil on the red, yellow, brown, white or orange paper. Children can do this very well themselves on a piece of white or colored (eg yellow) A4 paper. Keep your fingers close together and your thumb far away.
- When you have wrapped your hand, cut your hand out. For smaller children, it is wise to have the babysitter do this.
- Success? Very good, on to the next step! Cut out the comb, wattle, beak, and legs of the chicken from the orange or red leaflet
- Now stick the comb, wattle and beak on the thumb of the hand that you have bent over.
- Then you stick the legs to the bottom of the hand
- It’s really starting to look like a chicken now, isn’t it?
- Only the eyes are still missing. Draw one eye with a black marker on the thumb of the hand.
- To give the chicken an extra nice effect, stick it on a colored background, for example, blue.
- Finally, you can decorate the chicken with markers, for example, give it wings or draw a lawn with beautiful flowers around the chicken.
- Now chicken is all the way! He turned out really well, don’t you think?! If you want you can make another one, but with a different color! Then you will soon have all kinds of nice different types of chickens. To make it extra fun, give the chicken a name
Source: http://www.knutselkoppen.nl/knutselen/dieren/knutselen_kip_van_hand.sht
The very hungry caterpillar
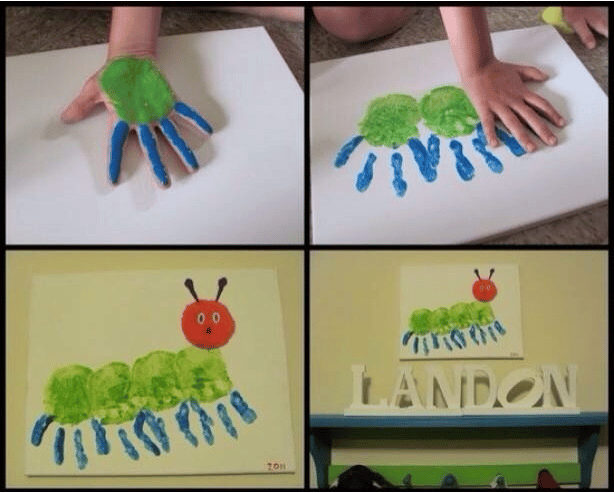
Every child’s caterpillar story is never enough. You as an au pair have probably read it from front to back and back again. Now you can imitate the caterpillar, how nice is that?! This is especially fun to do on a sad rainy day.
What do you need to make a caterpillar?
- Paint (blue, green, red and black, purple/dark blue and yellow)
- Brushes
- A bowl of water (for the brushes)
- An old tea towel or kitchen roll (to dry the brushes)
- A4 paper
- An apron, to prevent the clothes from getting completely dirty
What do you have to do to make a caterpillar?
- Start by making the child’s palm green and the fingers (except the thumb) blue. The child can also do this themselves. As a babysitter you can also participate by making your palms green and your fingers (except your thumb) blue.
- Then on a white A3 or A4, whichever you want, you press your hand on the field four times. As you can see you have now made the body of the caterpillar! If the paint on your hand runs out halfway through, just put new ones on. Not too much, because then you will get a size difference with your hands and of course you don’t want that. Tip: press hard, then you get an extra beautiful body.
- Wow you’re almost done! The only thing missing now is a face. Grab a brush and put some red paint on it. Make the circle of the head on the top of the green palm (which is at the end).
- Then you will make the ears with purple or dark blue paint.
- Clean the brush from the water and now make the eyes with green and yellow paint.
- And last but not least you make the nose with green paint and tada! Your caterpillar is finished!
You can always make more if you want
Stone bowl of a handprint
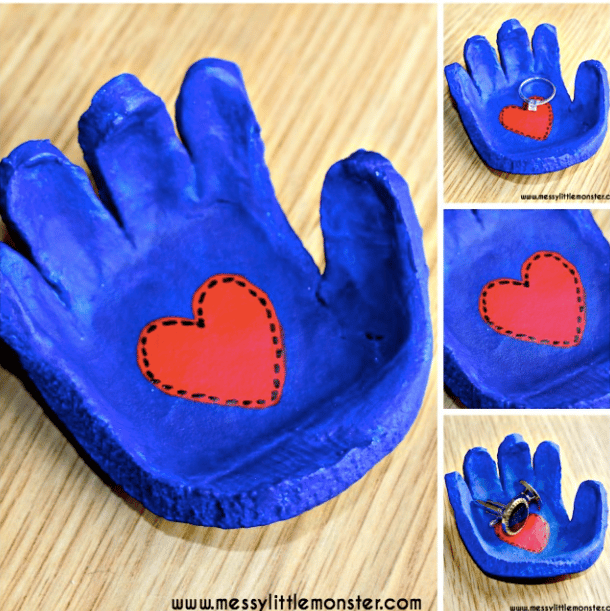
How cute is this stone bowl?! This is a very nice activity to do at a children’s party, or when it rains like pipes again. The kids will have fun with this for a few hours in any case. Especially children from the age of 4 can make these fun containers well.
What do you need to make a handprint tray?
- Salt Clay (Easy Salt Clay recipe)
- your own hand
- A small ovenproof dish
- Baking tray
- An oven
- Acrylic paint
- Brushes
- apron
- sharp blade
- A bowl of water (for the brushes)
- Old tea towel or kitchen roll (to dry the brushes
What do you have to do to make a handprint tray?
- Mix some salt dough with our easy salt dough recipe. You only need flour, salt, and water for this recipe!
- Flatten the salty dough with a rolling pin and press your child’s hand on the dough to make an impression of their hand. The salty dough should be about 1 cm thick. The child’s hand should be pressed quite firmly into the salty dough, pressing each finger to make a good impression. The child can also do this themselves.
- I recommend rolling the salty dough on parchment paper as it will be easier to transfer the salty dough later on.
- Use a sharp knife to carefully cut around the edge of the handprint. Let the sitter do this to prevent fingers from getting off.
- Place a small ovenproof dish on a baking tray and place the salt dough handprint around the bowl (see picture below). For example, you can use a small bowl intended for dips. This will create the shape of your handprint bowl. Take the time to make sure you’re happy with the shape of the salt dough hand.
- Done? Super! Now bake the handprint for a few hours in the oven at a low temperature (about 100 degrees Celsius).
- When you take it out of the oven, check whether the salt dough is completely hard on both sides, if it doesn’t feel like that just put it in the oven a little longer.
- Is he good? Yes! Then we can start painting. Put an apron on the child, because acrylic paint will no longer come out of your clothes. Make it as fun as possible.
- When your bowl is dry, you can pack it nicely for mom, dad or grandma. Or you can of course keep it yourself and put it in your room!
If you don’t have a small ovenproof bowl, you can place the hand mold over a small plastic bowl or ball and let the salty dough air dry, but this method will take several days to dry.
Below I have added the recipe for the salt clay:
What do you need to make salt clay?
- Two cups of flour (can be any kind of flour)
- One cup of salt
- One cup of water (you will probably need less)
It’s super easy! Follow the four steps below to make the best salt clay.
What should you do for making salt clay?
- Start by mixing the two cups of flour in a bowl with the cup of salt.
- Then add the cup of water. Add it gently and slowly, as you will probably need less than the cup.
- Just knead! Knead the dough well.
- Do this until it has become a nice dough!
- Finished? Bake it!
Source: https://www.messylittlemonster.com/2016/05/Salt-dough-handprint-bowl-keepsake.html#more
Flower hands
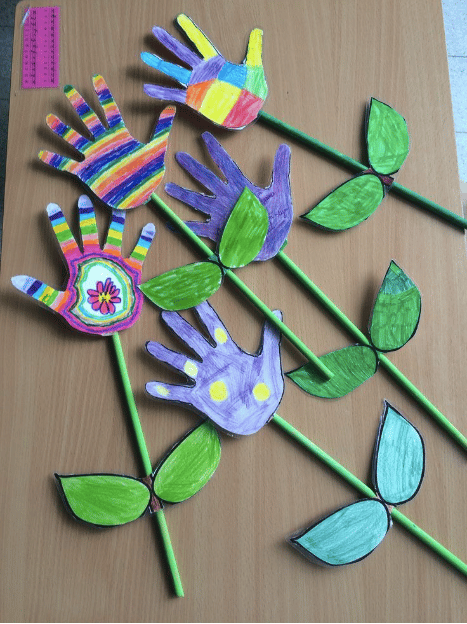
Spring is already in full bloom and these hand flowers are very appropriate. Very nice to make in the garden with children from the age of four. Have fun making these hand flowers!
What do you need to make flower hands?
- Colored paper
- Markers and crayons
- Scissors
- Adhesive tape
- green pipe cleaners
- Hole puncher
- your own hand
- White A4 paper
What do you have to do for making flower hands?
- First choose your favorite color of paper, which you will later trace your hand on.
- Start by tracing your hands. Children can do this very well themselves on a piece of colored paper. Keep your fingers close together and your thumb far away.
- When you have wrapped your hand, cut your hand out. For smaller children, it is wise to have the babysitter do this.
- Done? Color it! Color your hand with the colors you want to use. You can of course just leave it as it is, since it already has a color of its own. It is up to you.
- If you think your hand is nice enough, stick the hand to the pipe cleaner with an adhesive tape. You only need a small adhesive tape for this, because it is not nice if you see the adhesive tape sticking out behind the hand.
- Now cut two leaves from a white or green A4 piece of paper. Note: You do this by folding the paper in half, so that you can glue the two leaves in one go. You can make the leaf even more beautiful by pulling a dark green edge around the green paper and making a dark green stripe in the middle of the leaf. You can color the white leaf completely green with a green marker or a green pencil.
- Finally, stick the leaves to the flower and you’re done!
Here too you can make as many flowers as you want. To give the hand flowers an extra nice effect, you can put them in a vase.
Source: https://www.knutselidee.nl/verjaardag/handbloemen.htm